Building a Wavetable Synthesizer from Scratch with Rust, WebAssembly, and Web Audio

A spectrogram visualization of the output of a wavetable of which this article details the construction
Overview
Wavetable Synthesis is a method for synthesizing audio by interpolating between different pre-sampled waveforms stored in a table. It's a very neat way to generate sounds that change over time, allowing the different waveforms to morph into each other slowly in order to create rich and complicated textures.
I've been experimenting with synthesizing audio in the web browser via my web-based DSP project, and figured that wavetable synthesis would be a cool addition to the platform. It seemed like a simple enough thing to implement from scratch and an awesome opportunity to put Rust and WebAssembly to work in a useful way! As it turns out, it's both a really well-fitting usecase for Rust/Wasm and terrific context for a tour of the broader WebAudio landscape.
If you'd like to see the end result of this article, skip down to the Demo Section
Agenda + Prerequisites
This article takes a journey through the full process of implementing a wavetable synth from scratch. It goes through both the full process of writing the code to implement the synth's DSP code itself, applicable DSP and audio theory, as well as several extra pieces including ways of populating the wavetable and interacting with it programmatically via the WebAudio API. There are also some sections in the middle that go rather deep into techniques for optimizing the generated WebAssembly module and working with Wasm.
It assumes you're familiar with Rust and JavaScript, at least to some degree. It also assumes you know the basics of WebAssembly and the features it provides for computing in the browser. It will be incredibly helpful to know some of the basics of working with Wasm from Rust - just flipping through the first few chapters of the linked book should be enough to get you going.
Knowing some basics about computer audio and digital signal processing would also be useful, but I do my best to explain most of the audio-related things as fully as possible.
Resources
A fully-functional version of the wavetable synth demo embedded in this article can be found in the source code for this website.
The full Rust code for implementing the wavetable itself can be found here
And the JavaScript code for the AudioWorkletProcessor can be found here.
Background on Wavetables and Computer Audio Programming
The construction of the wavetable itself is relatively straightforward: All that is needed is a bunch of sampled waveforms in memory. It's possible to have any number of these waveforms in the table, and the number of samples in each waveform is arbitrary as well.
As a bit of background, in computer audio sound is represented as a series of floating point numbers from -1 to 1. These represent the physical position of the speakers as the electromagnets that control them are powered on and off. By varying this value over time, the speakers move and vibrate the air molecules, producing sound. The rate and amount by which these values change determines the kind of sound that is produced. It's kind of awesome how direct of a connection there is between the code and the physical world here - that's something that you don't see every day when working with modern software.
A waveform is nothing but a list of these floating point samples. Most waveforms produced by synthesizers are periodic, meaning that the same pattern of samples repeats infinitely over and over to produce a constant sound. In the case of this wavetable synth, we will loop back to the beginning of the waveform once we reach the end. This means that we have to have at minimum one period of the wave stored in the table, otherwise we won't have enough information to fully re-construct the sound.
Anyway, a wavetable just consists of a 2D array of samples. As we move through the table, we interpolate between the different waveforms within it, meaning just that we mix their samples together - take a (weighted) average of the two floating point numbers. Take for example the simplest case: a table with just two waveforms. Let's assume that the "range" of this wavetable goes from 0 to 1; any value within this range can be selected to sample the wavetable in a slightly different way.
If waveform A is at the beginning of the wavetable at position 0 and waveform B is at the end of the wavetable at position 1, then we would sample both waveforms at the same sample index and then mix those two samples together according to the position that we're at in the table. In this way, we can sample the table using a 2D coordinate of (sample index, mix factor). In the visualization below, the red line represents the sample index, and the blue log represents the mix factor.

Each time we take a sample, we increase our sample index by some amount in order to move through the waveform. The amount that we move is equal to the ratio between the frequency of the waveforms in the wavetable and the desired output frequency of the wavetable. By increasing the number of samples that we advanced through the wavetable for each sample output, the pitch of the output is increased. The same goes in reverse. In order to support non-integer ratios, we interpolate between the samples along the x axis in the same way that we interpolate between waveforms on the y axis.
Adding More Dimensions
A 1D wavetable (well, 2D if you count the waveforms themselves as having a dimension due to the fact that they're made up of many individual samples) is cool as it is - you can get a lot of neat effects out of just moving around between the different waveforms there. That being said, what's stopping us from adding more layers of interpolation with other wave tables, mixing the interpolated result of the first dimension with the output of the second? Nothing, of course; computers are really really good at indexing into arrays of numbers in memory and mixing together floating point numbers.
In order to do that, we'll need to add two additional variables for each dimension: one to control the mix factor of the second dimension, and one to control the mix between that dimension and the previous dimension. So the total set of all inputs that we have when sampling our n-dimensional wavetable now look something like this:
sample_index: The current horizontal position within the wavetable marking the sample index of the waveforms that we're samplingoutput_frequency: The desired output frequency.output_frequency / wavetable_frequency = sample indices moved per sampledimension_0_mix: The mix factor of the first dimension; vertical position within the wavetable for that dimension
And additionally, for each dimension after the first one:
dimension_n_mix: The mix factor for the nth dimension; vertical position within the wavetable for that dimensiondimension_n_interdimensional_mix: The mix factor used to interpolate between the output of the previous dimension and this one
In a way, this can be thought of as constructing a chain of "virtual" wavetables, with the output of the previous wavetable serving as the input waveform for the interdimensional wavetable. Each wavetable is sampled independently and then mixed with the output of the previous dimension to yield its output, which can then be mixed again etc. It will probably be a good idea to use smaller mix factors for the higher dimensions in order to preserve the effects that the lower dimensions have on the sound; otherwise it's possible for a higher dimension with a high mix factor to almost entirely take over the generated sound.
The alternative to this sort of chaining strategy would be to have a single mix factor for each dimension that all added up to 1.0 and then do a weighted average of the outputs from each of them according to their mix factor. The issue with this that I imagine, however, is that there are many more opportunities for signals to cancel themselves out of degrade to noise in that kind of environment. When we mix only two dimensions together at a time, the interactions are much more tightly controlled, and we get an additional parameter with which to control the mix between dimensions.
Implementation Overview
Implementing the wavetable synthesizer will require three different pieces:
- The Rust/WebAssembly module which implements the wavetable itself including functions to configure and sample it
- An
AudioWorkletProcessorthat runs on a special audio processing thread and reads data out of the wavetable into output channels - Some driver code that runs on the main/UI thread, creates + initializes an
AudioWorkletNodethat connects to theAudioWorkletProcessor, and connects our wavetable to the WebAudio graph.
From the main thread, we will register our custom AudioWorkletProcessor and create a WebAudio node that serves as a handle to it, allowing us to connect the output of the wavetable into the WebAudio graph. From within the created AudioWorkletProcessor, we will instantiate the WebAssembly module, construct + configure a wavetable synth instance using settings from the main thread, and pass its outputted audio into connected output channels.
Wavetable Implementation
We'll be implementing the wavetable itself entirely in Rust which we'll then compile to WebAssembly. Wasm is an excellent fit for this use case. It provides reliably high performance - a necessity for any kind of realtime audio application. Digital signal processing is also almost entirely implemented via numerical operations, meaning that we won't have to go out of our way implementing complicated internal APIs or de/serializing data between JavaScript and Rust.
Data Structures
So now that we know what we want to do, we have to figure out how to translate it into code. The solution that I ended up with was potentially a bit overcomplicated as I split things up a bit more than was probably necessary. I originally designed it with the possibility of multiple voices being sampled out of the same wavetable simultaneously, but later dropped that idea because it would require adding the complication of mixing those voices together, normalizing volume, and other stuff. That being said, here are the data structures that I came up with:
Click to expand code
pub struct WaveTableSettings {
    /// Number of `f32` samples in a single waveform
    pub waveform_length: usize,
    /// Number of dimensions in the wave table that can be mixed
    pub dimension_count: usize,
    /// Number of waveforms in each dimension
    pub waveforms_per_dimension: usize,
    /// Frequency of the samples that are stored in the wavetable
    pub base_frequency: f32,
}

pub struct WaveTable {
    pub settings: WaveTableSettings,
    pub samples: Vec<f32>,
}

/// Represents a single voice playing out of an attached `WaveTable`
pub struct WaveTableHandle {
    pub table: &'static mut WaveTable,
    /// The current horizontal index in the wavetable specifying the index in the waveforms from
    /// samples will be retrieved
    pub sample_ix: f32,
    /// Buffer into which mix values for each sample for each dimension are copied from JavaScript
    pub mixes: Vec<f32>,
    /// Buffer to hold the mix values for each dimension and inter-dimensional mixes as well
    pub mixes_for_sample: Vec<f32>,
    /// The buffer into which the output from sampling the wavetable is written
    pub sample_buffer: Vec<f32>,
    /// Stores the frequencies that each of the samples should play at
    pub frequencies_buffer: Vec<f32>,
}
By allowing all of the wavetable's properties to be defined dynamically via WaveTableSettings, users are able to use the wavetable in a variety of different ways without having to do any kind of re-compilation. The drawback is that we do have to do some dynamic allocations in order to create the table, but these allocations are all up-front and shouldn't be a cause for any kind of performance problems outside of making the resulting Wasm module a little fatter.
There's a partial solution for just this use case in the wee-alloc crate, but I've run into strange issues with memory corruption while using that crate in the past (which may or may not stem from issues with my own code or bugs in wee-alloc iself), but in any case I opt to take the few-KB Wasm blob size penalty and stick with the default allocator.
AudioWorkletProcessor Implementation
The WebAudio spec supports two methods for implementing custom DSP code: ScriptProcessorNode and AudioWorkletProcessor. ScriptProcessor is now deprecated, however, leaving AudioWorkletProcessor as the de-facto standard. Unfortunately, Firefox does not yet support AudioWorkletProcessor, so it will be necessary to use Google Chrome in order to run this project.
AudioWorkletProcessor is superior to ScriptProcessorNode because it runs the DSP code on a separate thread, freeing up the main thread for things like rendering the UI and handling input events. ScriptProcessorNode uses an event-based API to perform digital signal processing, and all code runs on the main thread. I've worked with both approaches, and I can say that the benefits of using AudioWorkletProcessor are immense: doing any kind of work on the UI thread such as rendering React components or rendering audio visualizations will cause really bad clicks, pops, and cutouts of audio being processed with a ScriptProcessorNode.
Challenges Posed by AudioWorkletProcessor
Naturally, there are a few trade-offs that come with using AudioWorkletProcessor. Any time more than one thread gets involved, complexity tends to go up quickly. That being said, there are certainly good ways to deal with those new challenges, and the resulting crisp, jitter-free audio is well worth it.
When using WebAssembly from an AudioWorkletProcessor, we don't get a lot of the benefits of the modern JavaScript ecosystem that tools like webpack bring us. Since the code in audio worklet processors runs on a separate thread than normal JavaScript, there are many restrictions put on the JavaScript code that executes there compared to what can be done on the main/UI thread. One of these limitations is that we are unable to make network requests to fetch things dynamically from within the processor - a reasonable limitation, all things considered. This poses a problem for using Rust-generated Wasm in audio worklet processors due to the way that wasm-bindgen works.
Currently, almost every piece of documentation for compiling Rust to WebAssembly uses wasm-bindgen to make interacting with Rust-generated Wasm from JavaScript easy. It's a really awesome tool - it automatically generates TypeScript types and JavaScript functions that correspond directly to your Rust functions, it takes care of transforming JS data structures like strings into Rust data structures in Wasm, and it does all of that automatically. The generated JavaScript code gets created as an ES module that wraps over the underlying Wasm module, abstracting it entirely from the view of the developer when interacting with it from JavaScript.
The modules generated by wasm-bindgen are asynchronously loaded - they return a JavaScript Promise since fetching, compiling, and instantiating Wasm modules is an asynchronous process. They perform an import of the Wasm module at the top level which Webpack sees, causing it to pass on that asynchronous import behavior to the wasm-bindgen module as well. Webpack takes care of a lot of this complication via the import() syntax; it automatically generates the code that fetches the async module and returns a Promise that will resolve to the module once it finishes initializing.
However, since the only way to load the modules generated by wasm-bindgen is by making a request to fetch it dynamically, and we can't even use Webpack at all for audio worklet processors, that pretty much rules out using wasm-bindgen for our Rust code.
Compiling Rust to WebAssembly without wasm-bindgen
Luckily, there is still a way to generate Wasm modules from Rust without having to use wasm-bindgen at all. Back in the early days of Rust's Wasm support before wasm-bindgen came into being, that was the only way to do it. What we lose with this approach is the ability to pass complicated data structures back and forth between Rust and JavaScript; the only data type that currently exists in Wasm is numbers. In our situation, that's not too bad: audio is just numbers, after all, so we should be able to get by reasonably well within that limitation.
One of the nice abstractions that wasm-bindgen provides is the ability to pass arrays back and forth between JavaScript and Rust with ease. We'll have to do this ourselves, but the benefit is that we get to do delightfully low-level things to the Rust code running inside of Wasm. There's no feeling quite like that obtained from writing bytes directly into Rust's memory and watching as all of those beautiful safety guarantees it provides crumble:

Manually Optimizing Generated Wasm
The WebAssembly ecosystem, although still pretty young, has a rich array of tooling available for working with Wasm modules and transforming them in-place. Since the Wasm binary format is designed to be easily readable and extremely standardized, it's possible for tools to operate directly on Wasm blobs and perform optimizations to reduce their size or even increase their performance via things like inlining and loop unrolling. The wasm-opt tool, available as part of the binaryen toolchain, does just that and all via a simple command line interface. To install wasm-opt and optimize the generated Wasm module,
» git clone git@github.com:WebAssembly/binaryen.git
» cd binaryen
» mkdir build && cd build
» cmake ..
» make -j8 # Replace 8 with your CPU's core count
» sudo make install
Then, to optimize a Wasm module using all possible optimizations,
» wasm-opt dist/wavetable.wasm -O4 -o dist/wavetable.wasmFor many Wasm modules, you will see module size decreases of >30% - pretty terrific for something that can run without even looking at the source code that generated it!
However, after building the wavetable Wasm module and running wasm-opt, I was shocked to see that it was still over 1MB in size! This was really surprising because it uses no external dependencies, doesn't do any kind of complicated string manipulation or anything like that, and doesn't even include the overhead created by wasm-bindgen for its shim imports/exports. Using a tool called twiggy, I profiled the Wasm module that was produced:
» cargo install twiggy
» twiggy top dist/wavetable.wasm

 Shallow Bytes │ Shallow % │ Item
───────────────┼───────────┼─────────────────────────────────────────
        582478 ┊    33.20% ┊ custom section '.debug_str'
        456731 ┊    26.03% ┊ custom section '.debug_info'
        305913 ┊    17.44% ┊ custom section '.debug_line'
        177960 ┊    10.14% ┊ custom section '.debug_ranges'
        142882 ┊     8.14% ┊ custom section '.debug_pubnames'
         52017 ┊     2.96% ┊ custom section '.debug_pubtypes'
         16984 ┊     0.97% ┊ custom section '.debug_aranges'
          4633 ┊     0.26% ┊ custom section '.debug_abbrev'
          3145 ┊     0.18% ┊ code[29]
          1062 ┊     0.06% ┊ code[41]
           939 ┊     0.05% ┊ code[34]
           866 ┊     0.05% ┊ data[0]
           ...
It seems that there are some extremely large debug sections getting emitted even though I don't have debug info turned on for release builds. By default, wasm-bindgen takes care of doing a couple of things to reduce the size of the Wasm modules it generates. One of these things is to remove these custom debug sections that are generated by the Rust compiler. We can do that manually ourselves by using a tool called wasm-strip provided by the WebAssembly Binary Toolkit (WABT):
» git clone git@github.com:WebAssembly/wabt.git
» cd wabt && git submodule update --init
» mkdir build && cd build
» cmake ..
» make -j8 # Replace 8 with your CPU's core count
» sudo make install
» wasm-strip dist/wavetable.wasm
Checking with Twiggy again, it looks like that did the trick:
» twiggy top dist/wavetable.wasm

 Shallow Bytes │ Shallow % │ Item
───────────────┼───────────┼──────────────────────────────────────
          3145 ┊    21.40% ┊ code[29]
          1062 ┊     7.22% ┊ code[41]
           939 ┊     6.39% ┊ code[34]
           866 ┊     5.89% ┊ data[0]
           728 ┊     4.95% ┊ code[32]
           683 ┊     4.65% ┊ code[8]
           ...

» ls -l dist/wavetable-wasm
-rwxr-xr-x 1 casey casey 14700 Dec  6 09:06 dist/wavetable.wasm
Our Wasm module now clocks in at a stunningly slim 14.7KB, dropping down to a minuscule 6.5KB after gzip. Now that's what I'm talking about!
Debugging Without Strings or Dev Tools
One additional challenge with working with Wasm without the help of wasm-bindgen is debugging. wasm-bindgen allows the use of crates like console-error-panic-hook which let you use normal log macros to print directly to the JavaScript console. However, we're stuck without such luxuries. In addition, the Google Chrome dev tools debugger isn't really any use to us; it will allow us to view stack traces when Wasm crashes and even step through code to a limited extent, but we can't actually see any of the state of Wasm memory (and it would be very hard to know what those values meant even if we could).
Since we're doing some pretty unsafe things and dismissing most of Rust's safety guarantees by crossing the language barrier and playing with Rust's memory directly, it's very likely you'll encounter a crash like this at some point while working with Wasm:
wasm-0073919e-272:1 Uncaught RuntimeError: unreachable
    at __rust_start_panic (wasm-function[272]:0x3a63)
    at rust_panic (wasm-function[271]:0x3a57)
    at _ZN3std9panicking20rust_panic_with_hook17ha2bba1247bb0572dE (wasm-function[268]:0x37bd)
    at _ZN3std9panicking18continue_panic_fmt17h3fe76dc127276107E (wasm-function[267]:0x366c)
    at rust_begin_unwind (wasm-function[266]:0x35cb)
    at _ZN4core9panicking9panic_fmt17h63b32cb68e9a917bE (wasm-function[290]:0x5635)
    at _ZN4core9panicking18panic_bounds_check17heb6f9ff8e4fbd5b6E (wasm-function[286]:0x54a1)
    at _ZN68_$LT$usize$u20$as$u20$core..slice..SliceIndex$LT$$u5b$T$u5d$$GT$$GT$5index17hcc7fe0e8b6d61acdE (wasm-function[96]:0xe33)
    at _ZN4core5slice74_$LT$impl$u20$core..ops..index..Index$LT$I$GT$$u20$for$u20$$u5b$T$u5d$$GT$5index17h08ace2165fbfe5c6E (wasm-function[95]:0xe0d)
    at _ZN77_$LT$alloc..vec..Vec$LT$T$GT$$u20$as$u20$core..ops..index..Index$LT$I$GT$$GT$5index17h5d1836d3a1e0cae5E (wasm-function[114]:0x10b8)
Although it's not as nice as the usual formatted panic message with line numbers and real variable values, we still get a good amount of info. If the backtrace alone isn't enough to figure out the issue, we're left with two options: Write JavaScript code that loads Rust strings from pointers, decodes them into JS strings, and prints them (and suffer through debugging that in addition to the issues we're already having with the wavetable code) or avoid strings altogether and create debugging functions that pass numbers back to JS that we can print out and inspect.
I opted for the second approach, creating several helper functions that take an id param (allowing me to trace back this log call to which line it was called on) and a number of arbitrary data arguments:
extern "C" {
    pub fn debug1_(id: i32, v1: f32);
    pub fn debug2_(id: i32, v1: f32, v2: f32);
    pub fn debug3_(id: i32, v1: f32, v2: f32, v3: f32);
    pub fn debug4_(id: i32, v1: f32, v2: f32, v3: f32, v4: f32);
}

pub fn debug1(id: i32, v1: f32) { unsafe { debug1_(id, v1) } }
pub fn debug2(id: i32, v1: f32, v2: f32) { unsafe { debug2_(id, v1, v2) } }
pub fn debug3(id: i32, v1: f32, v2: f32, v3: f32) { unsafe { debug3_(id, v1, v2, v3) } }
pub fn debug4(id: i32, v1: f32, v2: f32, v3: f32, v4: f32) {
    unsafe { debug4_(id, v1, v2, v3, v4) }
}
When instantiating the Wasm module in the AudioWorkletProcessor, we just have to provide exported functions to match the imports in Rust:
const debug = (id, ...args) => console.log(`[${id}]: ${args.join(' ')}`);
const importObject = {
  env: {
    debug1_: debug,
    debug2_: debug,
    debug3_: debug,
    debug4_: debug,
  },
};

const compiledModule = await WebAssembly.compile(data.arrayBuffer);
const wasmInstance = await WebAssembly.instantiate(
  compiledModule,
  importObject
);
Using this strategy, which brings the worst of both worlds from binary debugging with tools such as gdb and println-debugging, I was able to track the few off-by-one errors and other small bugs that existed in the Rust code.
Dynamically Controlling the Mixes
The interface that AudioWorkletProcessor provides us with for processing audio data is the process function. It gives us an array of input channels (which we ignore), an array of output channels (which we will write the output of the wavetable into), and a map of AudioParams.
AudioParams are WebAudio constructs that represent numbers that can change over time. You can connect anything in the WebAudio universe to an AudioParam: constant values, the output of OscillatorNodes, or even audio samples out of a buffer. AudioWorkletProcessor provides that ability to define a set of input AudioParams that will be accessible during its execution. Inside of our AudioWorkletProcessor class, there's a spot to define a set of custom AudioParams that our processor will have access to. They will be generated and exposed on our class instance, allowing us to connect whatever want to them.
The API for defining these is a static getter. Here's the code that I came up with to create AudioParams for each of the intra-dimensional mixes and inter-dimensional mixes for all but the first dimension:
Click to expand code
const MAX_DIMENSION_COUNT = 16;

class WaveTableNodeProcessor extends AudioWorkletProcessor {
  static get parameterDescriptors() {
    return [
      {
        name: 'frequency',
        defaultValue: 440,
        automationRate: 'a-rate',
      },
      ...Array(MAX_DIMENSION_COUNT)
        .fill(null)
        .map((_, i) => ({
          name: `dimension_${i}_mix`,
          defaultValue: 0.0,
          minValue: 0.0,
          maxValue: 1.0,
          automationRate: 'a-rate',
        })),
      ...Array(MAX_DIMENSION_COUNT - 1)
        .fill(null)
        .map((_, i) => ({
          name: `dimension_${i}x${i + 1}_mix`,
          defaultValue: 0.0,
          minValue: 0.0,
          maxValue: 1.0,
          automationRate: 'a-rate',
        })),
    ];
  }
}
Since parameterDescriptors is a static getter, it must be supplied statically. That means we can't do anything like wait until we know how many dimensions this wavetable will have before creating the AudioParams to control them, so we have to make sure we have as many as we'll ever need up front. I figured 16 dimensions is more than plenty, so I went with that. Plus, there's not really any cost associated with creating an AudioParam that's never used.
AudioParam Automation Rates
Notice the automationRate: 'a-rate' parameter on the parameter descriptors we define. This indicates that a unique value for each of the generated AudioParameters should be collected for each sample that we process. If 'k-rate' was supplied, only a single value for each frame (128 samples) would be collected.
Note that if the AudioParam's value doesn't change during an entire frame, only one value will be stored in the data array. We need to remember and handle that when we're reading values out of the params and into the wavetable's inputs.
Lazily Instantiating the WebAssembly Module
As previously mentioned, it's impossible to make network requests to load async resources from within an AudioWorkletProcessor. It's also impossible to synchronously load a Wasm module - the browser APIs simply don't exist. That means that we need some way to get our Wasm module over to the AudioWorkletProcessor's thread and dynamically instantiate it.
The solution is AudioWorkletProcessor's message-passing capabilities. Using its port field and the corresponding port field on the AudioWorkletNode handle, we can send + receive messages between the main thread and the AudioWorkletProcessor's thread. So, to solve our lazy-loading problem, we can do the following:
- Dynamically fetch the Wasm module on the main thread as a raw byte buffer
- Send the module over to the
AudioWorkletProcessorvia theport. We can also send over settings + params for the wavetable at this point along with the waveforms with which to populate it. - Once we receive the module in the processor, compile and instantiate it
- Use the Wasm module to construct a wavetable and wavetable handle that can be used to read out of it
On the main thread, that will look something like this:
// Register our custom `AudioWorkletProcessor`, and create an `AudioWorkletNode` that serves as a
// handle to an instance of one.
await ctx.audioWorklet.addModule('/WaveTableNodeProcessor.js');
const workletHandle = new AudioWorkletNode(ctx, 'wavetable-node-processor');

// ... Constructing settings + waveforms for the wavetable not shown

// Fetch the Wasm module as raw bytes
const res = await fetch('./wavetable.wasm');
const moduleBytes = await res.arrayBuffer();

// Send the Wasm module, waveform data, and wavetable settings over to the processor thread
workletHandle.port.postMessage({
  arrayBuffer: moduleBytes,
  waveformsPerDimension,
  dimensionCount,
  waveformLength: waveformSampleCount,
  baseFrequency,
  tableSamples,
});
Over on the AudioWorkletProcessor thread, we have to listen for and handle that message:
Click to expand code
class WaveTableNodeProcessor extends AudioWorkletProcessor {
  constructor() {
    super();

    this.port.onmessage = (event) => this.initWasmInstance(event.data);
  }

  initWasmInstance(data) {
    this.dimensionCount = data.dimensionCount;

    const compiledModule = await WebAssembly.compile(data.arrayBuffer);
    this.wasmInstance = await WebAssembly.instantiate(compiledModule, {});

    // Call the Rust function exported from the Wasm module to create a wavetable instance with
    // the settings provided from the main thread
    this.waveTablePtr = this.wasmInstance.exports.init_wavetable(
      data.waveformsPerDimension,
      data.dimensionCount,
      data.waveformSampleCount,
      data.baseFrequency
    );

    // Wasm memory doesn't become available until after some function in the Wasm module has
    // been called, apparently, so we wait to set this reference until after calling one of the
    // Wasm functions.
    this.float32WasmMemory = new Float32Array(
      this.wasmInstance.exports.memory.buffer
    );

    // Grab the pointer to the buffer where the wavetable's waveforms' data will be stored
    const wavetableDataPtr = this.wasmInstance.exports.get_data_table_ptr(
      this.waveTablePtr
    );
    const wavetableDataArrayOffset = wavetableDataPtr / BYTES_PER_F32;
    if (wavetableDataPtr % 4 !== 0) {
      throw new Error('Wavetable data array pointer is not 32-bit aligned');
    }

    // We set a marker value into the data table on the Wasm side; we check that it matches here
    // to ensure that we've got the correct pointer;
    if (this.float32WasmMemory[wavetableDataArrayOffset] !== -1) {
      throw new Error(
        'Marker value not set at initial wavetable sample data table pointer retrieved from Wasm'
      );
    }

    // Write the table's data into the Wasm heap
    this.float32WasmMemory.set(data.tableSamples, wavetableDataArrayOffset);

    // Create a handle to the wavetable that we can use to sample it
    this.waveTableHandlePtr = this.wasmInstance.exports.init_wavetable_handle(
      this.waveTablePtr
    );

    // Grab a pointer to the buffer in which we'll store the mix parameters for the different
    // dimensions
    const mixesPtr = this.wasmInstance.exports.get_mixes_ptr(
      this.waveTableHandlePtr,
      FRAME_SIZE
    );
    if (mixesPtr % 4 !== 0) {
      throw new Error("Mixes array pointer isn't 4-byte aligned");
    }
    this.mixesArrayOffset = mixesPtr / BYTES_PER_F32;
  }

  process(_inputs, outputs, params) {
    // Since the Wasm module and wavetable are all asynchronously loaded, we need to wait until
    // after they're available to start outputting audio.  Until then, we just output silence.
    if (!this.waveTableHandlePtr) {
      return true;
    }

    // ... sample wavetable, write samples to output.  We'll get to that in a bit.
  }
}
Constructing the Waveforms
Taking a step back from the implementation of the wavetable itself, we need to generate some waveforms to seed it with!
For testing and demo purposes, I figured it would be a good idea to implement a 2-dimensional wavetable populated with the 4 basic waveforms: sine, triangle, sawtooth, and square. Generating them from scratch is straightforward enough, and they can be modified to any desired frequency.
I decided to use a low frequency of 30hz for the wavetable in order to have as high of a resolution as possible when interpolating between samples when sampling at higher frequencies. On important property of the waveforms used to populate the wavetable is periodicity - the waveforms need to be able to loop back to their beginnings smoothly without cutting off in the middle of a period. If a waveform used to build the wavetable is cut off, looping it will create outputs like this:

Malformed waveforms like that will introduce clicking, buzzing, or other unwanted audio artifacts into the generated sound, so it's important to make sure that the waveforms used to build the wavetable really are periodic and are properly aligned. Since the normal sample rate of audio used in WebAudio is 44100hz (44100 samples per second - very standard for computer audio), there are 44100/30 = 1470 samples in a single period of the wave. That means for for the 30hz waves we'll be generating, the waveforms will need to be arrays of 1470 samples.
So here are the parameters that we'll be using to generate our waveforms and the wavetable they'll live in:
const SAMPLE_RATE = 44100;
const desiredFrequency = 30; // 30hz

const waveformSampleCount = SAMPLE_RATE / desiredFrequency;
Generating Waves
Sine waves are just the sine function. The sine function naturally has a period of 2π, and we need to scale that into a period of (sample_rate / desired_frequency). So, the equation we use to generate the samples of our 30hz sine wave is y = sin(x * (2π / (44100 / 30))):
for (let x = 0; x < waveformSampleCount; x++) {
  bufs[0][x] = Math.sin(x * ((Math.PI * 2) / waveformSampleCount));
}
Triangle waves start at -1, spend half a period rising linearly to 1, and then half a period linearly falling back down to -1. I found that the easiest way to think about this one was to treat it as a repeating piecewise function with one piece on each half of the waveform:
// triangle wave; goes from -1 to 1 for one half the period and 1 to -1 for the other half
for (let i = 0; i < waveformSampleCount; i++) {
  // Number of half-periods of this wave that this sample lies on.
  const halfPeriodIx = i / (waveformSampleCount / 2);
  const isClimbing = Math.floor(halfPeriodIx) % 2 == 0;
  // `%1` is a trick to get the decimal part of a number in JS
  let val = 2 * (halfPeriodIx % 1) - 1;

  // If we're on the second half of the waveform, we flip the sign
  if (!isClimbing) {
    val = -val;
  }

  bufs[1][i] = val;
}
Square waves are at -1 for half of a period and then at 1 for the other half:
// square wave; half a period -1, half a period 1
for (let i = 0; i < waveformSampleCount; i++) {
  const halfPeriodIx = i / (waveformSampleCount / 2);
  const isFirstHalf = Math.floor(halfPeriodIx) % 2 == 0;

  bufs[2][i] = isFirstHalf ? -1 : 1;
}
Sawtooth waves start at -1 and then rise linearly to 1 throughout the whole period, resetting back to -1 immediately at the beginning of the next period. It can be implemented rather easily by just repeating a scaled y = x function:
// sawtooth; climb from -1 to 1 over 1 period
for (let i = 0; i < waveformSampleCount; i++) {
  // What fraction of the way we are through the current period
  const periodIxFract = (i / waveformSampleCount) % 1;

  // Scale from [0, 1] to [-1, 1]
  bufs[3][i] = periodIxFract * 2 - 1;
}
To help with debugging, I dumped the generated waveforms to CSV and plotted them:
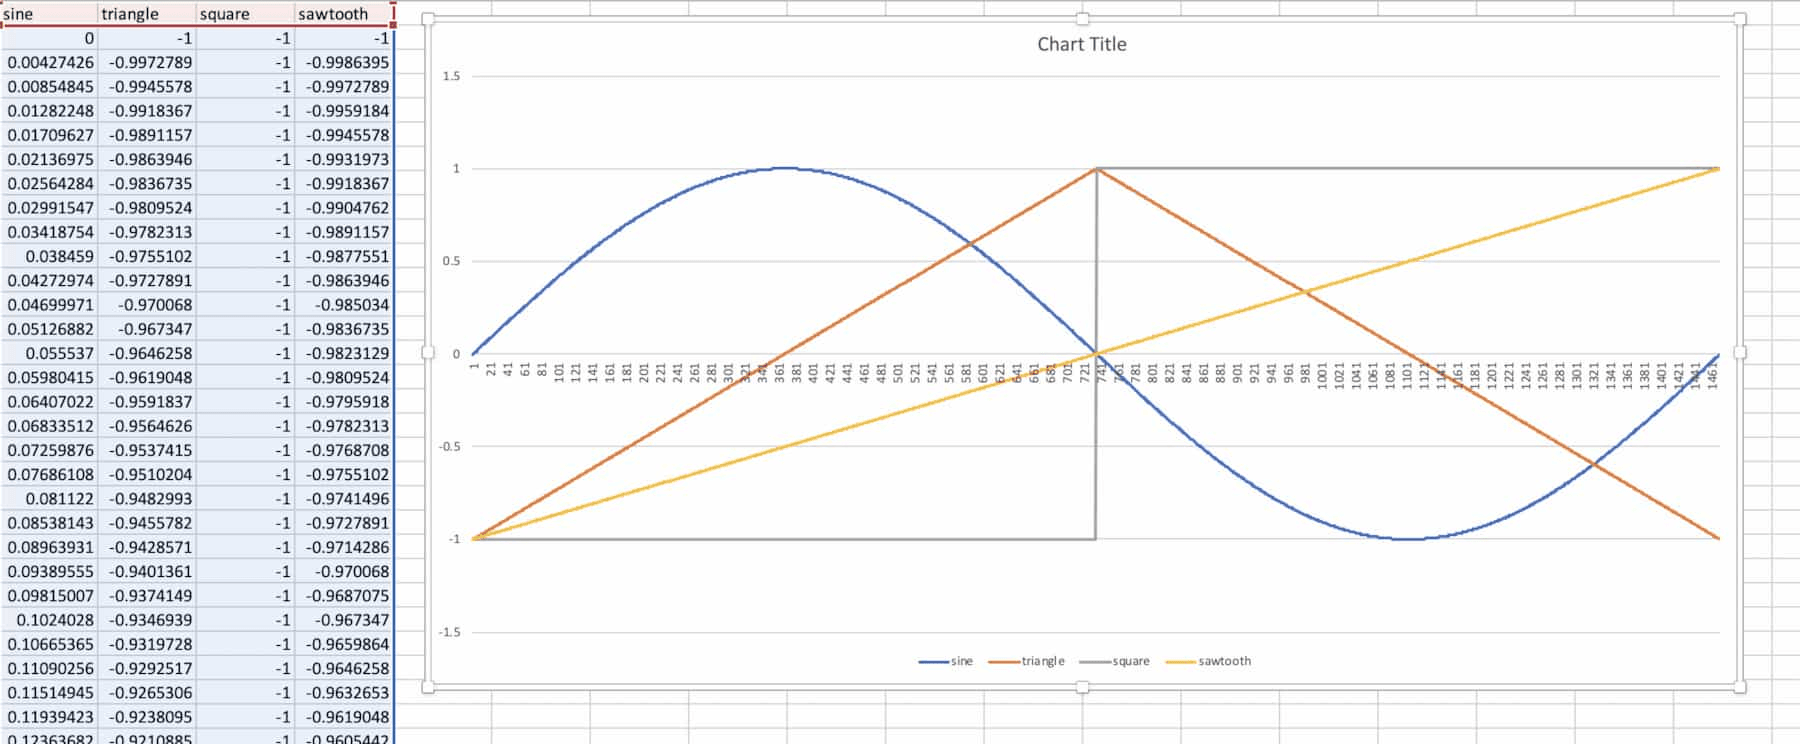
Looks good! All of the periods line up and the waveforms look like we'd expect them to.
Populating the Wavetable
Once we have out source waveforms, we now need to use them to build the WaveTable data structure itself in Wasm. Luckily, the implementation is very simple - it's just all of the waveforms for all of the dimensions concatenated into a big 1D array:
// I felt that this would be more efficient than using a real multi-dimensional array
// since all of the data is in the same allocation and the different waveforms are near
// each other in memory.

const wavetableData = new Float32Array(
  dimensionCount * waveformsPerDimension * waveformSampleCount
);

for (let dimensionIx = 0; dimensionIx < dimensionCount; dimensionIx++) {
  for (let waveformIx = 0; waveformIx < waveformsPerDimension; waveformIx++) {
    for (let sampleIx = 0; sampleIx < waveformSampleCount; sampleIx++) {
      const i =
        samplesPerDimension * dimensionIx +
        waveformSampleCount * waveformIx +
        sampleIx;
      wavetableData[i] = wavetableDef[dimensionIx][waveformIx][sampleIx];
    }
  }
}
In case you've not seen it before, Float32Array is a Typed Array which is a special JavaScript data structure optimized for storing only 32-bit floating point numbers. Besides being much more performant than normal JS arrays, they also have several useful methods for copying data around which are useful for moving data in and out of Wasm memory.
In order to get the data out of our JavaScript arrays and into Wasm, we first need to allocate the data structures that it will be stored in. On the Rust/Wasm side, I've created some exported functions for doing that.
init_wavetable creates a new empty wavetable instance with the provided settings:
Click to expand code
impl WaveTable {
    pub fn new(settings: WaveTableSettings) -> Self {
        let wavetable_data_size = settings.get_wavetable_size();
        WaveTable {
            settings,
            samples: vec![-1.0; wavetable_data_size],
        }
    }
}

// Marking the function as `#[no_mangle]` is required in order to
// make the function exported for use from JavaScript
#[no_mangle]
pub fn init_wavetable(
    waveforms_per_dimension: usize,
    dimension_count: usize,
    waveform_length: usize,
    base_frequency: f32,
) -> *mut WaveTable {
    let settings = WaveTableSettings {
        waveforms_per_dimension,
        dimension_count,
        waveform_length,
        base_frequency,
    };

    Box::into_raw(Box::new(WaveTable::new(settings)))
}
It handles allocating the buffer into which the table's data will go. The return type of the function is *mut WaveTable which is a raw pointer to the allocated WaveTable struct on the Rust/Wasm heap. When this function is called, that pointer is returned to JavaScript as a normal number which serves as an index into the Wasm memory buffer for the wavetable module.
I also created a second helper function for retrieving a pointer to the generated wavetable data buffer:
#[no_mangle]
pub fn get_data_table_ptr(handle_ptr: *mut WaveTable) -> *mut f32 {
    unsafe { (*handle_ptr).samples.as_mut_ptr() }
}
Potential Pointer Pitfalls
It's important to note that we're actually leaking that memory from the Rust side. The only way that the underlying Box will ever get drop()'d is if we re-cast it to a Box on the Rust side and let it fall out of scope. Although currently the created wavetable exists for the life of the Wasm module and the AudioWorkletProcessor that owns it, if any future features ever involve modifying/replacing the generated wavetable, creating cleanup functions would be necessary in order to avoid a memory leak. That can be implemented simply enough like this:
#[no_mangle]
pub fn drop_wavetable(table: *mut WaveTable) { drop(unsafe { Box::from_raw(table) }) }
One other easy mistake that has stung me several times in the past is accidentally dropping the boxed handle in a function that's only meant to operate on it/access it. For example, if we implemented the get_data_table_ptr function like this:
#[no_mangle]
pub fn get_data_table_ptr(handle_ptr: *mut WaveTable) -> *mut f32 {
    let mut handle = unsafe { Box::from_raw(handle_ptr) };
    handle.samples.as_mut_ptr()
}
The handle would end up getting drop()d and the underlying heap allocations free()d. This can be very hard to track down and manifest itself in strange and mysterious ways with crazy data corruption and seemingly impossible control flows. One way to avoid the box from getting dropped is to use mem::forget to leak it explicitly:
#[no_mangle]
pub fn get_data_table_ptr(handle_ptr: *mut WaveTable) -> *mut f32 {
    let mut handle = unsafe { Box::from_raw(handle_ptr) };
    let data_ptr = handle.samples.as_mut_ptr();
    ::std::mem::forget(handle); // Prevent the `Box` from getting `drop()`'d
    data_ptr
}
Make sure that you either just deref the raw pointer directly or forget() the box before returning from the function.
Rust <-> JavaScript Interop
Anyway, our get_data_table_ptr function takes the pointer to the WaveTable as input, and using it would look like this:
const wavetablePtr = wasmModule.exports.init_wavetable(...args);
const wavetableDataBufferPtr =
  wasmModule.exports.get_data_table_ptr(wavetablePtr);
Now that we've set up space for the wavetable's data in Wasm memory, we need to copy our waveforms in from JavaScript. The Wasm memory is available as an ArrayBuffer via wasmModule.exports.memory.buffer. However, this poses a problem: we have 32-bit numbers, but the only way to write into an ArrayBuffer is byte by byte. In order to copy full f32s, we need to create a typed array view of that memory buffer:
const f32WasmMemoryView = new Float32Array(wasmModule.exports.memory.buffer);This doesn't actually allocate any new memory, but it provides an interface for reading from and writing to the Wasm memory buffer as if it was an array of 32-bit floating point numbers. The final step that we have to do is convert the wavetable data buffer pointer into an index in that f32 memory view:
const BYTES_PER_F32 = 32 / 8;
const f32ViewMemoryBufferIx = wavetableDataBufferPtr / BYTES_PER_F32;
We assume that the Rust compiler created the buffer with a 4-byte alignment; otherwise this isn't possible and everything burns down.
Anyway, the last step is to copy the wavetable data from JavaScript into Rust. There is a convenient .set() method on TypedArrays that does this very cleanly:
f32WasmMemoryView.set(wavetableData, f32ViewMemoryBufferIx);Wavetable Handle Setup
Now that we've got our wavetable built, the final thing we have to do is create a handle to read from it:
#[no_mangle]
pub fn init_wavetable_handle(table: *mut WaveTable) -> *mut WaveTableHandle {
    let handle = Box::new(WaveTableHandle::new(unsafe { ::std::mem::transmute(table) }));
    Box::into_raw(handle)
}
Since the mix parameters and frequency will change over time, we need a way to update them as well:
Click to expand code
#[no_mangle]
pub fn get_mixes_ptr(handle_ptr: *mut WaveTableHandle, sample_count: usize) -> *mut f32 {
    let mut handle = unsafe { Box::from_raw(handle_ptr) };

    while handle.sample_buffer.len() < sample_count {
        handle.sample_buffer.push(0.0);
    }

    while handle.mixes.len() < sample_count * handle.table.settings.dimension_count * 2 {
        handle.mixes.push(0.0);
    }

    let mixes_ptr = handle.mixes.as_mut_ptr();

    mem::forget(handle);

    mixes_ptr
}

#[no_mangle]
pub fn get_frequencies_ptr(handle_ptr: *mut WaveTableHandle, sample_count: usize) -> *mut f32 {
    let mut handle = unsafe { Box::from_raw(handle_ptr) };

    while handle.frequencies.len() < sample_count {
        handle.frequencies.push(440.0);
    }

    let frequencies_ptr = handle.frequencies_buffer.as_mut_ptr();

    mem::forget(handle);

    frequencies_ptr
}
On the JavaScript end, we'll have to handle fetching values for each of these mix params for each sample and copying them into Wasm memory.
Sampling the Wavetable
Well, we're about ready to start reading out of our freshly allocated wavetable. There are two pieces to this process: the Rust code to actually perform the interpolations and retrieve the samples and the JavaScript piece to implement the AudioWorkletProcessor interface.
Rust Side
We expose one function to serve as the entrypoint to the actual sampling of the wavetable:
Click to expand code
#[no_mangle]
pub fn get_samples(handle_ptr: *mut WaveTableHandle, sample_count: usize) -> *const f32 {
    let mut handle = unsafe { Box::from_raw(handle_ptr) };

    // Make sure we have enough space in our output buffer for all generated samples
    while handle.sample_buffer.len() < sample_count {
        handle.sample_buffer.push(0.0);
    }

    for sample_ix in 0..sample_count {
        // Copy the mix parameter values for this sample out of the input buffer
        for dimension_ix in 0..handle.table.settings.dimension_count {
            handle.mixes_for_sample[dimension_ix * 2] =
                handle.mixes[(dimension_ix * 2 * sample_count) + sample_ix];
            handle.mixes_for_sample[dimension_ix * 2 + 1] =
                handle.mixes[(dimension_ix * 2 * sample_count) + sample_count + sample_ix];
        }

        // Use the handle to pull the sample out of the wavetable and store it in the output buffer
        let frequency = handle.frequencies_buffer[sample_ix];
        handle.sample_buffer[sample_ix] = handle.get_sample(frequency);
    }

    let sample_buf_ptr = handle.sample_buffer.as_ptr();

    mem::forget(handle);

    // Return a pointer to the output buffer from which we can read the output in JavaScript
    sample_buf_ptr
}

impl WaveTableHandle {
    fn get_sample_ix_offset(&self, frequency: f32) -> f32 {
        frequency / self.table.settings.base_frequency
    }

    pub fn get_sample(&mut self, frequency: f32) -> f32 {
        // Pull out sample out of the wavetable.  Internally, it will interpolate between the
        // waveforms of each dimension and between the dimensions themselves to return a single
        // output value.
        let sample = self
            .table
            .get_sample(self.sample_ix, &self.mixes_for_sample);

        // Move forward horizontally through the wavetable, wrapping back around to the start of
        // the waveform buffer if we go over the end
        self.sample_ix += self.get_sample_ix_offset(frequency);
        if self.sample_ix >= (self.table.settings.waveform_length - 1) as f32 {
            self.sample_ix %= (self.table.settings.waveform_length - 1) as f32;
        }

        sample
    }
}
Finally, here's the code that I wrote for doing those lookups and interpolations:
Click to expand code
fn mix(mix_factor: f32, low: f32, high: f32) -> f32 {
    ((1.0 - mix_factor) * low) + (mix_factor * high)
}

impl WaveTable {
    fn sample_waveform(&self, dimension_ix: usize, waveform_ix: usize, sample_ix: f32) -> f32 {
        let waveform_offset_samples = (dimension_ix * self.settings.get_samples_per_dimension())
            + (waveform_ix * self.settings.waveform_length);

        let sample_mix = sample_ix.fract();
        let (sample_low_ix, sample_hi_ix) = (sample_ix.floor() as usize, sample_ix.ceil() as usize);
        let (low_sample, high_sample) = (
            self.samples[waveform_offset_samples + sample_low_ix],
            self.samples[waveform_offset_samples + sample_hi_ix],
        );

        mix(sample_mix, low_sample, high_sample)
    }

    fn sample_dimension(&self, dimension_ix: usize, waveform_ix: f32, sample_ix: f32) -> f32 {
        let waveform_mix = waveform_ix.fract();
        let (waveform_low_ix, waveform_hi_ix) =
            (waveform_ix.floor() as usize, waveform_ix.ceil() as usize);

        let low_sample = self.sample_waveform(dimension_ix, waveform_low_ix, sample_ix);
        let high_sample = self.sample_waveform(dimension_ix, waveform_hi_ix, sample_ix);

        mix(waveform_mix, low_sample, high_sample)
    }

    pub fn get_sample(&self, sample_ix: f32, mixes: &[f32]) -> f32 {
        debug_assert!(sample_ix < (self.settings.waveform_length - 1) as f32);

        let waveform_ix = mixes[0] * ((self.settings.waveforms_per_dimension - 1) as f32);
        let base_sample = self.sample_dimension(0, waveform_ix, sample_ix);

        // For each higher dimension, mix the base sample from the lowest dimension with the output
        // of the next dimension until a final sample is produced
        let mut sample = base_sample;
        for dimension_ix in 1..self.settings.dimension_count {
            let waveform_ix =
                mixes[dimension_ix * 2] * ((self.settings.waveforms_per_dimension - 1) as f32);
            let sample_for_dimension = self.sample_dimension(dimension_ix, waveform_ix, sample_ix);
            sample = mix(mixes[dimension_ix * 2 + 1], sample, sample_for_dimension);
        }

        sample
    }
}
The result of all of this is that work is an output buffer full of freshly-picked samples, ready to be converted into voltage signals in your speakers. It's now up to the JavaScript code in the AudioWorkletProcessor to pull them out and push them into the WebAudio graph where the web browser will take care of the rest.
JavaScript Side
All of the action involved with actually processing audio in AudioWorkletProcessor happens in the process() function. Every 128 samples, the process() function will be called. It is provided three arguments: inputs, outputs, and params.
Since we are an audio source, we can ignore inputs entirely. outputs contains an array of Float32Arrays - one for each output channel that we are connected to. It is our job to generate audio using our attached wavetable and write the resulting audio samples into each of the output channels.
params is a mapping which contains one Float32Array for each of the AudioParams that we defined in parameterDescriptors - it's how we're able to get values for each of our mixes on each sample we're concerned with. Since we defined all of our AudioParams as a-rate, there will be up to one value for each AudioParam for each sample in the frame.
Since AudioWorkletProcessor operates on frames of 128 samples and there is a non-zero cost associated with calling a WebAssembly function from JavaScript, I decided upon an interface that allows all of the samples in the frame to be processed at once from within Wasm, meaning that we have to copy all of the inputs in at once first and then copy all of the outputs out after. The input data that we have to copy is the frequency and mix values for each of the dimensions:
Click to expand code
// Write the mixes for each sample in the frame into the Wasm memory.  Mixes are a flattened 3D
// array of the form `mixes[dimensionIx][interOrIntraIndex][sampleIx]`
for (let dimensionIx = 0; dimensionIx < this.dimensionCount; dimensionIx++) {
  const intraDimensionalMixVals = params[`dimension_${dimensionIx}_mix`];
  const interDimensionalMixVals =
    dimensionIx > 0
      ? params[`dimension_${dimensionIx - 1}x${dimensionIx}_mix`]
      : null;

  for (let sampleIx = 0; sampleIx < FRAME_SIZE; sampleIx++) {
    // We're not guarenteed to have a unique value for each of the `AudioParams` for every sample
    // in the frame; if the value didn't change, we could have as few as one value.  In the case
    // that we have less `AudioParam` values than samples, we re-use the last value.
    const intraVal =
      intraDimensionalMixVals[
        Math.min(sampleIx, intraDimensionalMixVals.length - 1)
      ];
    // Handle the case of the first dimension, which doesn't have any inter-dimensional mix
    const interVal = interDimensionalMixVals
      ? interDimensionalMixVals[
          Math.min(sampleIx, interDimensionalMixVals.length - 1)
        ]
      : 0;

    const dstIntraValIx =
      this.mixesArrayOffset + dimensionIx * FRAME_SIZE * 2 + sampleIx;
    const dstInterValIx = dstIntraValIx + FRAME_SIZE;
    // Apparently the `minValue` and `maxValue` params don't work, so we have to clamp manually to [0,1]
    this.float32WasmMemory[dstIntraValIx] = clamp(0, 1, intraVal);
    this.float32WasmMemory[dstInterValIx] = clamp(0, 1, interVal);
  }
}

// Write the frequencies for each sample into Wasm memory
const frequencyBufPtr = this.wasmInstance.exports.get_frequencies_ptr(
  this.waveTableHandlePtr,
  FRAME_SIZE
);
if (frequencyBufPtr % 4 !== 0) {
  throw new Error("Frequency buffer pointer isn't 4-byte aligned");
}
const frequencyBufArrayOffset = frequencyBufPtr / BYTES_PER_F32;
if (params.frequency.length === 1) {
  for (let i = 0; i < FRAME_SIZE; i++) {
    this.float32WasmMemory[frequencyBufArrayOffset + i] = params.frequency[0];
  }
} else {
  this.float32WasmMemory.set(params.frequency, frequencyBufArrayOffset);
}
Alright - it's finally happening. Our wavetable is primed, loaded up with input values, and ready to go. All that we have to do is call the exposed function:
const generatedSamplesPtr = this.wasmInstance.exports.get_samples(
  this.waveTableHandlePtr,
  FRAME_SIZE
);
On the Rust/Wasm side, our wavetable implementation will fetch samples for each of FRAME_SIZE, write them to a buffer, and return us a pointer to it.
The last step is to copy the output data out of that buffer in Wasm memory and into all connected output channels:
Click to expand code
if (generatedSamplesPtr % 4 !== 0) {
  throw new Error("Generated samples pointer isn't 4-byte aligned");
}
const generatedSamplesArrayOffset = generatedSamplesPtr / BYTES_PER_F32;

// Copy the generated samples out of Wasm memory into all output buffers
for (let outputIx = 0; outputIx < outputs.length; outputIx++) {
  for (let channelIx = 0; channelIx < outputs[outputIx].length; channelIx++) {
    for (let sampleIx = 0; sampleIx < FRAME_SIZE; sampleIx++) {
      const sample =
        this.float32WasmMemory[generatedSamplesArrayOffset + sampleIx];
      outputs[outputIx][channelIx][sampleIx] = sample;
    }
  }
}

// Returning `true` from `process()` indicates that we have more data to process
// and this function should keep getting called.
return true;
That's it - our work is done. Other WebAudio nodes can now be connected up to this one as outputs and further process the generated audio, store it in a buffer, or pipe it out to the speakers.
Putting It All Together
Now that we have a valid AudioNode capable of producing audio, we just need to plug the wavetable node into the WebAudio AudioDestinationNode and modulate the input mix params to make it all worthwhile.
First, we need to initialize our wavetable synth node and fill it with the waveform data we generated earlier:
Click to expand code
const ctx = new AudioContext();

// Register our custom `AudioWorkletProcessor`, and create an `AudioWorkletNode` that serves as a
// handle to an instance of one.
await ctx.audioWorklet.addModule('/WaveTableNodeProcessor.js');
const workletHandle = new AudioWorkletNode(ctx, 'wavetable-node-processor');

// Using those waveforms we generated earlier, construct a flat array of waveform samples with
// which to fill the wavetable
const wavetableDef = [
  [bufs[0], bufs[1]],
  [bufs[2], bufs[3]],
];

const dimensionCount = 2;
const waveformsPerDimension = 2;
const samplesPerDimension = waveformSampleCount * waveformsPerDimension;

const tableSamples = new Float32Array(
  dimensionCount * waveformsPerDimension * waveformSampleCount
);
for (let dimensionIx = 0; dimensionIx < dimensionCount; dimensionIx++) {
  for (let waveformIx = 0; waveformIx < waveformsPerDimension; waveformIx++) {
    for (let sampleIx = 0; sampleIx < waveformSampleCount; sampleIx++) {
      tableSamples[
        samplesPerDimension * dimensionIx +
          waveformSampleCount * waveformIx +
          sampleIx
      ] = wavetableDef[dimensionIx][waveformIx][sampleIx];
    }
  }
}

// Fetch the Wasm module as raw bytes
const res = await fetch('./wavetable.wasm');
const moduleBytes = await res.arrayBuffer();

// Send the Wasm module, waveform data, and wavetable settings over to the processor thread
workletHandle.port.postMessage({
  arrayBuffer: moduleBytes,
  waveformsPerDimension,
  dimensionCount,
  waveformLength: waveformSampleCount,
  baseFrequency,
  tableSamples,
});
Then, we connect it to the context's AudioDestinationNode which corresponds to the computer's main sound output:
workletHandle.connect(ctx.destination);At this point, assuming everything went well, you should hear a 440hz sine wave playing. Since the frequency AudioParam defaults to 440 and all of the mixes default to 0, that means that we're just reading the first waveform of the first dimension (the sine wave) and all interpolation + mixing is 100% weighted to it, meaning that it's the only waveform contributing to the output sound.
In order to make things more interesting, we can use an OscillatorNode to modulate the mix param of the first dimension. However, we can't just .connect() the oscillator directly into the mix param because their ranges differ: OscillatorNodes produce output signals in the range of [-1, 1], but our mix param is expecting values in the range of [0, 1]. Luckily, we can use pre-made WebAudio nodes to perform a scale and shift of the oscillator's output frequency to map it into the correct range:
// Create an oscillator that outputs a 2hz triangle wave
const oscillator = new OscillatorNode(ctx);
oscillator.frequency.value = 2;
oscillator.type = 'triangle';
oscillator.start();

// Map the oscillator's output range from [-1, 1] to [0, 1]
const oscillatorCSN = new ConstantSourceNode(ctx);
oscillatorCSN.offset.value = 1; // Add one to the output signals, making the range [0, 2]
const oscillatorGain = new GainNode(ctx);
oscillatorGain.gain.value = 0.5; // Divide the result by 2, making the range [0, 1]

oscillator.connect(csn.offset);
oscillatorCSN.connect(oscillatorGain);
oscillatorCSN.start();
// `oscillatorGain` now outputs a signal in the proper range to modulate our mix param

const dimension0Mix = workletHandle.parameters.get('dimension_0_mix');
oscillatorGain.connect(dimension0Mix);
Now, the mix between the waveforms in the first dimension - a sine wave and a triangle wave - will be modulated between 0 and 1 two times a second. In the resulting audio, you should be able to hear the tone become a bit "harsher" as the extra harmonics introduced by the triangle wave getting mixed into the output become more apparent.
Extra - Visualizing the Wavetable's Output
There are a few different ways of visualizing audio. The two that I will focus on here are the Oscilloscope and the Spectroscope. Both of these are originally based on physical instruments, but both can be implemented in software and operate on audio samples in the same way as real waveforms.
Oscilloscope
An oscilloscope is used to view the waveforms themselves, very similarly to the manual plotting that was done in the Generating Waves section. I used a pre-made WebAudio oscilloscope called Wavy Jones in the demo below to visualize the generated waveforms. It works by using the WebAudio AnalyserNode, a node that performs Fast Fourier Transforms on incoming audio signals to facilitate visualizations just like this.
Here's an example of the output of the oscilloscope, showing how the waves morph between sine and square waves as the mix between the two dimensions is modulated up and down:

Spectroscope
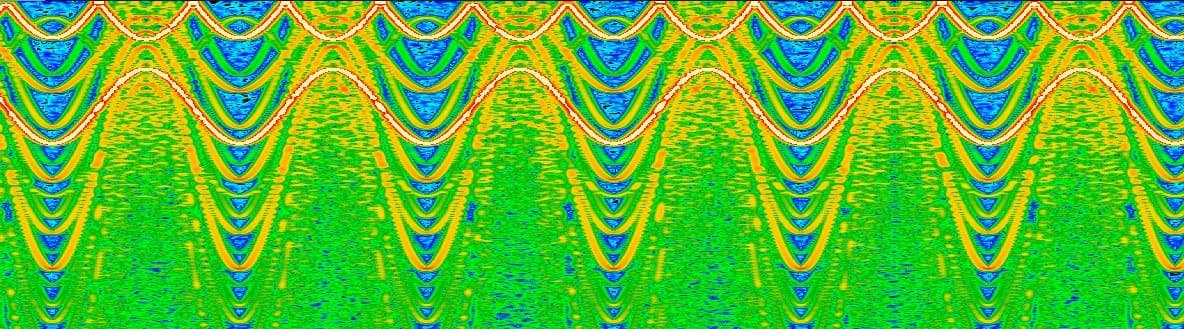
All sound is made up of different combinations of sine waves - this is known as the Fourier Series. The Fast Fourier Transform is an algorithm for decomposing signals into their composite frequencies, showing the intensity of each underlying sine wave that makes it up. By applying this transform repeatedly and plotting the intensities of the different frequencies along the y axis, tiling different samples over time along the x axis, a spectrogram can be produced:

In this spectrogram, recorded from a synthesizer playing different notes, the frequency increases going from top to bottom. The top line is the fundamental frequency - it's the frequency of the note that's being played. All of the lines below it are harmonics - they are produced as a result of the non-sinusidal parts of the waveform. In most signals, there are an infinite number of harmonics, but they grow increasingly weak as they grow further from the fundamental.
Spectrograms are useful for seeing these harmonics and visualizing the impact of filters and other digital signal processing effects. I implemented one from scratch as part of my web synth project - also using Rust/Wasm - and plan on releasing a blog post detailing how I did that soon, so stay tuned if you're interested!
Extra - FM Synthesis Using the Wavetable
FM Synthesis, which stands for Frequency Modulation Synthesis, is a technique by which new sounds can be produced by modulating the frequency of an oscillator with another oscillator. It allows really neat noises to be produced and has a very distinctive sound.
As it turns out, it's possible to implement a form of FM synthesis by modulating the mix parameter very rapidly. It's not exactly the same thing as pure FM synthesis with two oscillators, but it's definitely got that distinctive FM sound. You can try it in the demo below - just check the "connect oscillator" box and then crank up the oscillator frequency anywhere past 50hz. This has the effect of modulating the mix between the two dimensions very rapidly, causing emergent frequencies to develop based off of the frequency of the modulating oscillator.
What's even more interesting to me is that changing the oscillator waveform has the effect of changing the timbre of the resulting sound to match what would normally be produced by a non-FM oscillator of that waveform. I don't know exactly what's going on to cause this, but it's really cool in any case.
Demo
Using all of the pieces that we put together along the way, I put together a small demo that shows everything off. The UI below controls the wavetable synthesizer, allowing you to play with different mix values between the dimensions. There's also the option to connect an oscillator to the param controlling the mix between the two dimensions.
NOTE: I'd avoid touching the frequency knob, at least right away; the oscilloscope implementation is tuned to lock to the frequency it's pre-set at; other frequencies will drift across rapidly and be difficult to see.
Also, be careful with the volume knob! I don't know what it is about WebAudio, but it seems to be able to bypass any kind of global volume restrictions that exist on any computer I run it on; I've blasted my ears many times by accident, which is why I start the volume out at a conservative 2.5% (I've clamped the range to 50% of maximum due to just how loud it can get)
The full source code for the demo can be found here: https://github.com/Ameobea/homepage/tree/master/src/components/WavetableDemo
Potential Future Improvements + Enhancements
Although we've created a fully-functional wavetable, it's quite minimal and lacks many of the finer features that are important to a high-quality synthesizer suitable for use in making music.
Avoiding Aliasing in Higher Frequencies
One issue with wavetable synthesis is aliasing. All sounds are made up of different combinations of sine waves set at different frequencies and intensities. As the frequency that the wavetable is sampled at goes up, it becomes possible for samples read from the table to pick up distortion due to high frequencies in their harmonic composition interacting with each other and interfering with the generated sound. The solution to this problem is to generate different wave tables for different frequency ranges and applying incrementally greater bandlimiting filters as the sampled frequency goes up.
Bandlimiting filters just chop off all harmonics that are above a certain frequency, reducing the aliasing problem by eliminating the high frequencies that interfere when signals are sampled. Although they can be computationally expensive to apply in real time, they can be applied when constructing the wavetable rather than when sampling it.
If we wanted to implement this for our wavetable, it would be relatively straightforward: We'd just have to add one more array dimension to the dimensions of the wavetable, storing multiple copies of each dimension's waveforms with increasing levels of bandlimiting. Then, we'd select which one to use based off of the frequency that they are being sampled at.
This would certainly be an important feature to implement if it was our goal to use this wavetable for any kind of serious synthesis, but it's not a necessity to get it working and sounding decent for most frequencies and involves a good deal of non-trivial digital signal processing knowledge.
Reducing Gain on Higher Frequencies
Due to the way that sound waves work, higher frequency sounds with the same amplitude as lower frequency sounds actually sound louder. This is due to the fact that volume is equivalent to the amount of energy in the sound waves, which is equal to the amount that they move the air. The amount that they move the are is equivalent to changes between the values of samples from sample to sample. You can actually compute the "power" of a waveform using the following code snippet:
const waveform = [0, 0.1, 0.2, ...rest];
const power = waveform.reduce(
  (acc, sample, i) => (i > 0 ? acc + Math.abs(sample - waveform[i - 1]) : acc),
  0
);
All of this just means that the average absolute value of the derivative of a sound wave is equal to how loud it is. Since higher frequency waves change more rapidly, they have more energy. In order to make the volume of higher frequencies equal to that of lower ones, it would be necessary to manually reduce the amplitude of higher-frequency signals.
Re-Sampling
Re-Sampling is a feature that many wavetable implementations provide which allows for the output of a wavetable to be captured and used as waveforms in a new wavetable. In a way, this is quite similar to the effect that is achieved via the multi-dimensional design of this wavetable - taking the full output of a wavetable and treating it as the input to a new wavetable. However, resampling provides a greater degree of control and allows for sounds to be re-used between different wave tables more easily.
It would also be very useful to add the ability to sample waveforms that are output from some other external WebAudio node and use them as waveforms in a wavetable. There would be some challenges involved with avoiding clipping, but at its core it's just a matter of reading in the samples and storing them in a buffer.
Conclusion
Well, if you made it this far, congratulations: You've conquered the full width of the stack - everything beyond this is just adding on top of these concepts. Using this same pattern of AudioWorkletProcessor combined with Rust-generated WebAssembly, any conceivable digital signal processing algorithm can be implemented with incredible performance characteristics. Once Wasm SIMD Support lands, there will be little to no performance differences between Wasm code and native code remaining.
As the web continues to move towards being the application platform of the future, I feel that WebAudio is a terrific example of what that kind of model can provide: A clean, language-agnostic, OS-agnostic, and hardware-agnostic API with native-level performance characteristics, generic enough to support anything imaginable with the common pieces pre-built. I hope that more and more systems are built which follow these kinds of patterns in the future, and I look forward to continuing to work with WebAudio as its use grows and its support becomes more complete across browsers.